My father gave me these hints on speech-making: “Be sincere … be brief … be seated.”
James Roosevelt
Using Official Templates
In many professional settings, you will have to use the official template for presentations. And in some cases, even have to recreate the official PowerPoint template in Keynote. Given that Keynote can open PowerPoint presentations, but some “tiny” things might change, check whether it really looks the same. You can create some slides in PowerPoint, export them as images, create the same slides in Keynote, and then import these images in Keynote to check whether everything is as it should be (put the image below the text). Only to see whether everything is as it should be.
Creating your Own Template
For private presentation, I’m a huge fan of a book-like presentation. You can actually use a next slide effect that makes sense (page flip), the background is not one solid color (boring), and you can use the slide number as “page number”.
Slide Design
However, while I like the cover slide and the page background of the “Leather Book” template, I don’t have any use for the leveled Text slides.

I rarely go for these, as I don’t (usually) use the slides as teleprompter. The Presenter Display is much more helpful (notebook shows current and next slide, time, and presenter notes). So reminders go into the presenter notes, and the slide itself is used to display only the things I like to visualize. Unless you really need to present a definition to dissect, there is rarely a reason to visualize what you say as sentences. Images work well (if possible), otherwise if anything short prompts or keywords are usually enough. I highly recommend this approach for most presentations (and Reynolds “presentation zen” and “The naked presenter” as inspiring books in this regard).
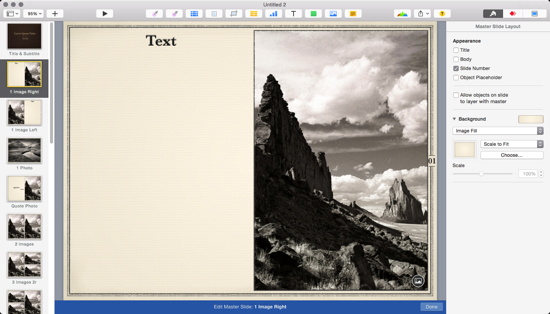
So I changed the design. You can edit the Master Slides via “View” – “Edit Master Slides”. Have a look at the format column on the right side (accessible with the brush, it’s also the place where you control animation settings (two red diamonds) and general features of the presentation (screen-like icon). You can drag in images as place holders (I just reused the ones that were already in the presentation). Use the format bar on the right to define them as media placeholder (same with text).
While my style relies heavily on images (1, 2, 3, or 4 per slide), I also wanted “image left with text right” slides (or vice versa). I use these split text/images for bullet points combined with an image. You can easily display multiple images on such a slide. Simply copy-pasting the image and putting it directly above the previous one and using the dissolve animation allows you to go through the list and (when needed) easily change the image. Just start with the first image, then put the next one above it, make sure it’s exactly over the previous one, and use the Animation settings to assign a “Build in” “dissolve effect”.
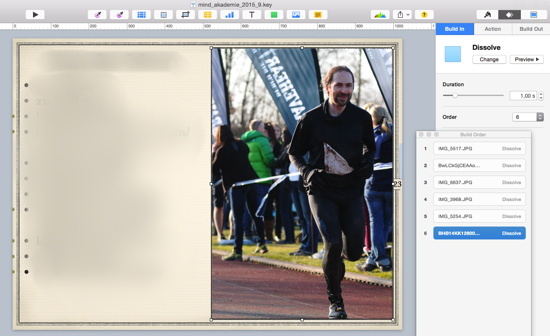
I usually add some reminders which bullet point has a corresponding image, e.g., the bullet point is in a different color (just put a colored point as text over it) or an additional point next to it on the same level (see above, sorry for blurring the bullet points, I haven’t given the presentation yet).
Fonts on the Mac and Fonts on the iOS Device (iPhone/iPad)
I’ve said it before, but be very careful with fonts. The advantage of sticking to the template fonts is that they most likely will work on an iPhone as well. While you can always export the presentation to PDF and use, e.g., GoodReader to display the presentation from your mobile device, or any other computer with a PDF reader installed (and it’s a great backup solution), using the Keynote app makes more sense. But iOS can only use a short list of fonts natively. If you are unsure whether the font you want to use is supported, then copy the keynote file onto your iOS device (e.g., via iTunes => iPhone icon, Apps, Keynote, drag into the window), open it in Keynote (import from iTunes) and try to open the presentation. You’ll get a list of fonts (and other issues) that are not supported. Given that missing fonts frequently lead to ugly slides (font does not fit, additional breaks, etc.) it’s important to check this well in advance and stick to the supported fonts. No idea why Keynote does not treat the prior dimensions of the font as box and scales the font down to fit within these “boxes”. Or at least gives a warning if a font is not supported on an iOS device.
Slide Numbers
One of the frequently missed but often helpful feature of a presentation are slide numbers. Especially when you want feedback or a discussion. Otherwise it’s “back a slide, no, further back, another one …”. The “Leather Book” template does not have Slide Numbers, so go to the master and add them. You find them under slide layout (the Format column on the right, when you do not click on an object like a text box or an image) under Appearance. If you fit the slide to the Window, you see them inserted at the bottom in the center of the slide. My guess is they were not considered while developing this template — they look pale and out of place. Personally, I have put them on the right side in the vertical middle of the presentation. To make them look neat (well, neater), I’ve added two short horizontal lines, changed the font size and style, and put a square with the same fill color as the background color beneath it (use the eyedrop tool in the colors menu to get the right color).
Editing the background image would have been another idea, but I am weary of going after images that are included in the template. Although that would have been easily possible via exporting a blank slide as image, editing the image, then changing the master slides to have this image as background. Anyway, so it was putting the square and lines into the right place, copy-pasting it to all master slides, then adding the Slide Numbers, changing the paragraph style and putting it in the right place.
Saving the Template
Once you have a working template and tested it (e.g., whether it works on an iOS device), you can save it as template (File => Save Theme). BTW, if you want to create incremental copies while you edit your template and miss the “Save as” command, click on the “File” menu while holding the “alt” button. The file menu changes. One of those annoying Keynote quirks (never liked “Duplicate”, likely never will).