“We did everything we said we were gonna do and nobody can take that away from us …”
Zack to Sheridan in Babylon 5: “Sleeping in Light”
Like written in the previous posting, I wanted to digitize the contents of my book shelf … and I did it. Last weekend, I cut and scanned 109 books. Yes, one hundred and nine books. OCR is also finished, as is reducing the file size (my MacBook was busy at night).
Here are some data:
- Size of scanned books (original): 8.19 GB
- Size of OCR’d books (with Acrobat 9): 4.79 GB
- Size of Reduced File Size books (with Acrobat 9, compatible with Acrobat 9): 1.48 GB
The reduced file size is still readable, although in some cases the compression is noticeable if you look closely at the text. But for reading them on the screen the quality is very well and turning the virtual pages is snappy with the reduced file size versions. However, I will keep the original scans. Color is compressed here as well (medium quality), but the quality is better than the reduced file size versions, and I might need them.
Why did I cut (and thus destroyed the physical version of) my books? There are a few reasons:
- I wanted to have them easily available, at work and at home, or in general, no matter where I am.
I cannot carry them with me physically, but if I have them in digital form, I can. At the moment, they even are on my USB-stick which I carry in my wallet, in best quality and in reduced file size. Try doing that with a book shelf. - I wanted to remove the distance to open them and retrieve information.
Yup, the bookshelf is only a few meters away, but it’s still easier to open them digitally and use the search function to go to the information I need. I will put them into my Wiki where they are easily available and where I can store the notes with the PDF. - I want to have control over the content.
Sure I could have bought them digitally as eBook, but I did not want to buy them again, especially not with DRM. I want to have PDFs that I can use in any way I want — copy whole paragraphs into my notes, search them, extract pages or images, the works. - Books are cheap.
I once sold about 70cm3 of books for 50 €. I paid … I don’t know, probably 500 € or even 1000 € for them originally. But if you have books where there are a million copies around, it’s pretty much worthless. So, instead of selling my books for almost nothing, I digitize them. I still have them available, but they take up no space.
I noticed the following advantages to digitizing one’s bookshelf this way:
- You end up with one virtual page equals one printed page.
Two book pages on one scanned page (which you would get if you open the book and put it on a flatbed scanner or copier with a scan unit) might save paper if you want to print it, but printing is not the reason for scanning. The reason is to read it on screen and easily make notes with the same medium and for this one page on one scanned page is ideal. If you want to print it some day you can still use the driver of the printer to put two scanned pages on one printed page. - No black areas.
If you are using a scanner with automatic size detection you get scans that have no black areas which cost a lot of ink/toner and look atrocious. - It’s fricking fast.
I am really fast in scanning books with a normal copier with a scan unit, where you have to put on each page spread and press a button. I did it during my time at the university when I was working as a student assistant, and I did it afterwards. I am a squirrel in many ways and I like to keep what I find. But I also want to work unencumbered by stuff that slows me down. Digital is the way to go and over time I really got fast in digitizing stuff. But this way surprised even me. It’s just so … fast.
Here are some tips for digitizing books (by gutting them):
Strategy
- Go in brackets.
For example, first scan all books about climbing, then all books about photography, and so on, so you ahve specific blocks of books that you have digital. Dealing with categories is more motivating than having 12 of 100 books scanned. - Start with the most precious book you want to scan but leave the most important category for last.
Afterwards, you have no qualms about scanning the “lesser” books. It’s kinda like dealing with pain, the worst pain comes first, then you know whatever comes next won’t be as worse and it’s easier to bear. Then again, keep the most important category for last. This will motivate you to go to the end. - Don’t try to compete with the scanner.
First I tried to cut books while the scanner was busy with the 25-30 pages it was scanning. Only the scanner beat me each and every time. I tried to work faster and this nearly destroyed some books (destroyed in the sense that I cut into the text). So I stopped competing with the scanner, which also meant stopping to parallelize the work. I first cut all books belonging to one category and then I did scan them (in some cases, I turned the pages of the block that was scanned next while the scanner was working to ensure that the pages are really separated from each other and do not cause a paper jam). But competing with the scanner … nope, the scanner is just to fricking fast.
Cutting the books:
Important note: Working with a cutter/blade is dangerous. If you are too stupid to realize that, don’t do it. I do not take any responsibility to what happens to you, your fingers or skin or whatever if you try to cut your books.
- Do not cut where you scan.
It might be nice to scan and at the same time (and place) cut the next book. Don’t. The cutting creates dust which will gravitate to the scanner and you have to clean it more often. Cut away from the scanner. I did the cutting in the “kitchen” while the scanner was on my desk about five meters away. - If you hurry a book dies needlessly.
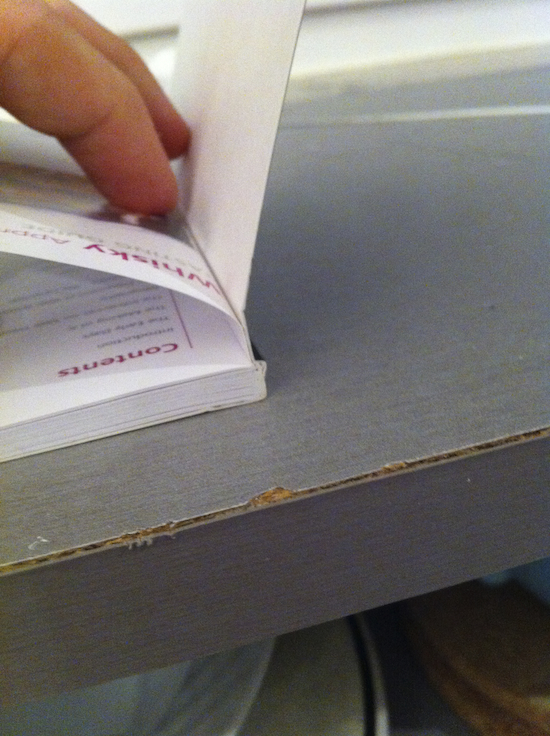
Cutting is delicate work and it’s very easy to cut into the letters on the page. So, take your time and cut carefully — many strokes with small advances cut the book. - Remove the cover first.
Even with paperbacks it’s more easy to cut if you remove the cover first. This often includes the first page, which is glued to the cover differently than the rest and can give you the impression of cutting farer away from the text than you really are (i.e., a book will die). It’s much easier to cut if the cover (including the back cover) is out of the way and you are only dealing with the book block.
- Mind the distance.
Sure, you do not want to cut into the text, but removing the spine is a trade off between being too close to the letters and having a paper jam because the pages still stick together (as if they were stapled). In some cases I had to manually turn each page (and for some pages, manually separate them) to make sure they are really separated because the text was close to the spine and I couldn’t keep more distance to the glue and the threads with which the pages are bound. - For book blocks that are like wood, cut the block into thinner pieces.
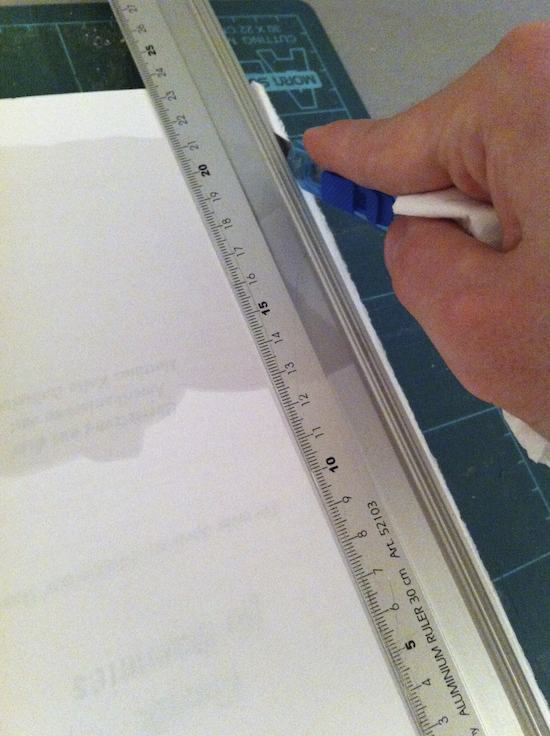
Cheap paper dream to cut, a few strokes and you’re through a 400 pages book, but some books are printed on high quality paper that is thin, sticks to each other and handles like wood if you want to cut through it. In these cases it can really help to separate the book block into smaller units. Open the book block and cut straight through the middle to separate the currently open spread. You have two (thinner) book blocks that you can cut more easily (or repeat the cutting procedure until you have really thin book blocks). - Use a metal ruler to assist the blade (and use the other side for it).
If you try to use a cutter with a plastic ruler the cutter will happily chip away the plastic. Metal is the way to go here. Make sure that you use the other side of the ruler, i.e., not the flat side with the size markings but the other, higher side. You don’t need the size markings but you need some elevation to make sure the blade doesn’t jump over the ruler.
- Don’t force the blade or extend it too far.
If you never learned it as a child, learn it now: never force the blade. And if you work with a cutter, never extend the blade too far. How much is too far? The blade will tell you with a “sploink” — the sound of the thin cutter blade breaking and jumping in front of your eyes (in my case, luckily, sideways). If you can’t cut deeper, remove the metal ruler and (if necessary) some pages. Usually the cutter should for the cut open which is more helpful than a longer blade, as it only gets stuck and breaks. - Elevate the blade more in the lower part of the book.
If you cut vertically (to you) elevate the blade more in the lower part of the book and use a little more force. The beginning and end of the cut are usually not as deep. I found it helpful to align the self-healing cutting mat with the book and the table so that I could cut into the open (mind the blade and do not stand in its way!).

After cutting the books:
- Try to remove as much dust as possible.
Cutting the books produces a lot of dust and dust in the enemy of any photographic unit, including scanners. Dust leads to dots on the scanned page and to vertical stripes. So, shake the pages and brush the cutting area. - Remove any traces of glue from the spine and the front cover page.
Unless you are really lucky and estimated the distance just right you will have traces of glue on the pages. This is often the case with the first page which is glued more strongly to the cover. The problem is that many scanners works with high temperatures (high meaning high enough to melt the glue). If the glue melts it sticks to the scanning area and it’s a bitch to clean. - Photograph the hardcovers
In some cases the covers were printed on sturdy paper and could not be scanned with the document scanner. In these cases I used my iPhone to simply take a photograph of the cover and used this photograph as cover for the PDF.
Scanning the books:
- Get a microfiber rug to clean the scanner.
If you see signs of dust (e.g., small dots on the scanned pages of high quality paper or vertical lines in images) clean the scanning area. I used a microfiber rug that belongs to my DSLR camera which worked really well. - Use the profiles
I created profiles for Cover (simplex, color), b/w book block (duplex, b/w), color book block (duplex, color), grayscale book block (duplex, grayscale) and single gray page (if a book has only a few photos, I scan it in b/w and then scan the pages that have grayscale photos, later I replace them in the PDF; simplex, grayscale; for b/w books with a few color pages I use the cover settings). All color scans were with medium compression because I do not want to scan artwork but have a readable version for the screen. - Avoid paper jams in the tray
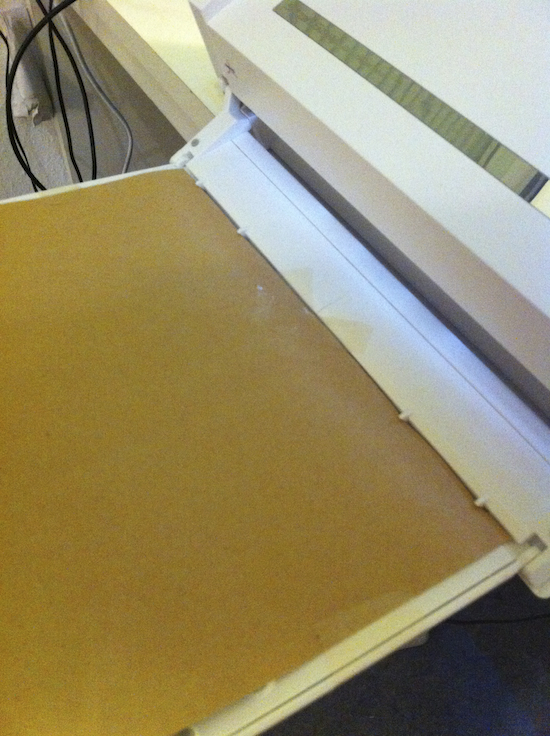
The scanner I used does seem to have a slight design flaw. In the paper tray there is a slight elevation that causes some paper sizes to jam. No big deal, because it’s in the tray and the pages only get curled, but it’s annoying and screws the page order. However, with some paper and some tape, you can smoothen out the tray and avoid these jams (see photo).
- Make sure that each and every page is scanned
I’ll still have to check the 109 PDFs whether each page was scanned (check with the page numbers). It should be all right, the scanner has a function that gives an alert if multiple pages were scanned, but mistakes happen. Only after I have made sure that each page was scanned I will throw away the remains of the books. - Do OCR and Reduce File Size later.
OCR and Reduce File Size can be done later with Acrobat 9 by selecting multiple documents at once and let Acrobat work over night. I did this after I combined the scanned files of one book into one document when I way away or sleeping. Just make sure you do not overwrite the original files (Acrobat asks you what to do) because OCR and Reduce File Size will reduce the file size of the scans and likely also the quality — and one day you might need the original quality. Some scanners offer to do OCR while scanning but I wouldn’t do it. It probably takes time — even if it’s only one or two seconds per scan, it’s time you could be using for something else. Let Acrobat do this when you are not working with your computer.
In retrospect I get dizzy when I compare the time it took me to digitalize the books this way compared to the time it would have taken me with my old flatbed scanner. Instead of cutting the books, putting them in and going zzz, zzz, zzz … finished, it would have been a long process even to get a single page scanned (open the book, put the correct spread on the flatbed scanner, press the button each time, waiting until the scanner heats up, waiting the painful seconds it takes to scan the page, correct the scanned page with the software, etc. pp. And it wouldn’t have been that much better for the book. Sure, the book would still be a book, but opening the book far enough to scan the whole spread (and avoid black bars in the middle where the paper is in some distance from the glass) would also have damaged the spine.
I guess it’s another strong reminder to make damn sure you use the right tools and the right technique to do the job, or to quote someone: “If you have eight hours to cut down a tree, it is best to spend six hours sharpening your axe and then two hours cutting down the tree.” And despite the high costs of destroying the books, this way worked admirably.
Brilliant! Just what I was looking for.
Very awesome & helpful information! Thank you for sharing!
It is motivating to hear you could do 109 books in one weekend! And lots of great tips I wouldn’t have thought of!
I certainly won’t be able to devote my whole weekend to it, but I have more hope that I can get through my bookshelf.
Some tips that I’ve learnt through my process of bringing new life to my professional library.
* Scan books and covers separately to avoid switching back and forth between scanning profiles. I scan books in B&W, covers in colour. To avoid switching I do all covers in one run and then drag them into the book PDF once ready.
* Scan in landscape if you can. My ScanSnap software will automatically rotate pages (most of the time) and the saving in time makes this worth doing even if you have to manually “select all, rotate” afterwards. A book that is 2/3 as wide as it is high will scan in 2/3 the time when in landscape.
* Make sure you have something robust as your cutting surface!
My scans are coming out in the 25-50mb range before compression so not sure how those mentioned in the article are so big. They look fine on a retina iPad3 so I’m not worried about it.
I’ve also used an adjusted naming standard of:
author, author (year) – title
as I felt uncomfortable not having the title in the name.
This has been such a valuable, liberating process.
Hoi David,
hey, landscape scan is a great idea … never thought about it, but sure, it should be faster this way … cool. Regarding the cutting surface, there are self-healing boards ideal for this purpose (arts and crafts supply store). Hmm, the title is also an interesting idea, many reference managers offer this as default file name, I think. My concern is that it makes the file name too long (with some titles), but yes, it has its advantages … hmmm … I’ll have to think about it … perhaps using the author_author_…_year as source info but keep the title in the file name of the PDF … definitely an advantage … thank you 🙂
All the best
Daniel
I was simply uncomfortable with the shortened name. If there are multiple articles by one person and I’m looking for something in particular I go for the title first as a memory jog.
Do you store source separate from the title in DevonThink? I can’t find a field for that.
David
Hmm, I use a, b, c, behind the name_year (_1, _2, _3, … would probably work better in hindsight, as the same author/year cited in the same paper is usually author_yeara, author_yearb, …) if a person has written multiple papers in the same year. For using the source info with your notes, I think the title is too long (and sometimes authors use very similar titles).
Now they have portable book scanner.
It is xcanex
http://www.youtube.com/watch?v=y2p_Nt2WQE0
scan 16pages in 5mins.
look cool.
finally.
Thank you for the link — it looks interesting. I also had a look at the product page … hmmm … would have to test it first, but it look pretty useful. It’s not as fast as a good document scanner (and I prefer this, it runs without me doing anything at the time, like holding the pages open) — but for books you cannot cut, esp. in a library where you cannot take the books with you: yup, cool.
its great scannjng books, i find i actually enjoy it. but after running ocr and saving the file as pdf/text is when the real work begins. i wish you would do a blog post on how to fix that file up. my scanned novel looks like complete crap in pdf. its all on one side, it has page numbers and all that.
can you do a detailed blog entry on how to fix the book up so it actually does resemble an ebook rather than just some text?
thanks.
Hmm, not sure whether this is spam or not, but still a valid question in a way. I think the issue here is how you save the file. Yes, I have seen people who distribute scanned books as text file. While it saves bandwidth, I think it is a mistake. Scan the file as PDF — by which I mean getting a PDF with the scanned images. Then use OCR and save it as PDF. The OCR’d text is on top of the image. You can read it easily, it looks similar to a book, yet at the same time, you can highlight the text and export the highlighted text. I would not want to work with pure text files for exactly the reason you mentioned — it looks like crap. Often indents and italics are lost. But when you work with PDF+text files (images of the pages + OCR’d text), you can really read it and highlight text.
Great thoughts on the advantages of digitizing. However, **cutting** the books??!?!?!? OMG. You mentioned in a previous post (http://www.organizingcreativity.com/2011/07/devonthink-second-impression-and-some-tips/) that “Yeah, I’ll end up in hell for that.” It is true! Digitizing is great but it should not be at the price of destroying the originals.
Yep, I’ll end up in hell, but at least, I’ll have plenty to read (Nah, they’ll probably give me an iPad but no adapter cable to recharge it.) 😉
But seriously, I can understand the hesitation and there are books I would never EVER cut, basically anything hand-bound or unique. But look at the mass market paperbacks — cheap paper, cheap print, made to be read once or twice. I have absolutely no qualms about cutting them. Other books (higher quality) — yup, it hurts a bit, but I would not want to miss the result. It’s just nice when you can read a book on an iPad — highlight text, export nice/useful quotations — all without DRM. Priceless 🙂
I have a SnapScan scanner and have been doing this same process with my physical book library for a few years. I love being able to search through my books quickly to find the right concept or quote to reference in an article or presentation. The only exception to my book destroying/scanning criteria is if I have a book that is signed by the author. In such cases, I buy a copy of that book and destroy the copy for the benefit of easy digital search.
I’m just getting started with DevonThink, and heard a suggestion that it may be better to break apart digital books into individual PDF pages than to keep as an entire PDF book when importing into DevonThink. The thinking is that when you are looking for something specific, only the digitized page will come up in a search as opposed to an entire PDF book. Do you have any thoughts on this? I’m simply looking for some expert advice as to what would be the best foot forward with scanned/OCRed books and specific searches through DevonThink.
Thanks.
Scott
Hmm, the only advantage I can think of (at the moment) of breaking up books into individual sections is separating edited books into the chapters written by individual authors. That’s when I split book scans (each chapter nevertheless gets the scans of the front matter, including the table of contents and the information needed for citation — otherwise it cannot stand on its own). Reason being that you (most likely) want to cite the chapters, not the whole (edited) book. Also helpful to prepare the chapters for your reference manager.
For everything else, I would leave books as they are. If I need to find something within a book I use the search function (given that my topic notebooks contain verbatim quotes — which are indicated as such! — this is pretty easy and gives me the page number for citation). If you need to find something more flexible within the PDFs, perhaps notes would work. Like using margin notes, just with the opportunity to search for them. Perhaps a # prior to your keywords might be useful to separate your notes from the text itself (if there is no search function that can be limited to the notes). But I would not break them down into individual pages — that would only lead to lots and lots of confusion and too many files.
Your digital versions of the scanned books are over 1GB in size? I scan books myself, and yes, the images amount to several GBs, but the way I post-edit them and convert them into digital versions gives me an end-product that is just a few MBs in size, and high-quality. I thought of making a guide about this, but have not find the time for it. Post-editing is not back-staking work if you have the right tools and knowledge.
The 109 books together were over 1GB, yep. I usually use Acrobats Reduce File Size, although there was a time when Acrobat had a hickup and did not deliver the file sizes I wanted. Most books end up below 10 MB (paperbacks, b/w, color front and back cover, OCR), some are between 10 MB and 100 MB (usually hundreds of color pages, reduced or not, OCR), and only a handful larger than that (hundreds of color pages where the image quality is crucial).
If you ever write that guide, drop me a line. I would be interested in reading it.
I bought a heavy-duty guillotine-style paper cutter (up to 400 sheets) to remove the spines from my books. It was about $150 but well worth it to be able to do it in one quick cut. I plan to keep it even after I’m done my present collection.
Cool, which one did you buy? Besides the time saving, the cost decreases for each book you cut. 150 books would be a dollar each, 300 only 50c, etc. and likely very quickly cheaper than doing it in a copy shop or sending the books away for cutting (not to mention not having to lift all books).
Hello Daniel,
I am wondering if you have figured out a good alternative to Adobe Acrobat 9, because as a 32bit app it will die after updating to the latest macOS. Personally I have not and I do not like subscription based apps. Any advice?
Greetings
Carsten
Yup, also left Adobe — loved InDesign, but the subscription model is a no go. Would lose access to something I have created just because the subscription runs out. Meh! Currently using the OCR included in DEVONthink (uses Abbyy Fine Reader if I’m not mistaken). For displaying PDF on my Mac I use PDF Expert, on iOS GoodReader (for Reading) or GoodNotes (for correcting student works).
Hello Daniel,
thank you for your response. This is nearly the same tools I am using. But I am in need for a tool for reducing file size as good as Adobe Acrobat Pro, PDF Expert seems not so effective for this purpose. Which tool do you use for effectively reducing the size of the PDF files?
PDF Expert — it’s likely not as good as Adobe Acrobat, but … well, it’s not a subscription model. So that’s good enough for me.