If we would only give, just once, the same amount of reflection to what we want to get out of life that we give to the question of what to do with a two weeks’ vacation, we would be startled at our false standards and the aimless procession of our busy days.
Dorothy Canfield Fisher
I am a bit skeptical of the Bullet Journal trend (just search for Bullet Journal on YouTube to see examples). Well, unless you see the journals themselves as work of art. Which they are, to me, given how much time and effort people invest in them and how beautiful they look.
But are they functional? Or do you spend time on planning, but not on doing?
For me at least, a bullet journal using paper would not work — given how crappy my handwriting is and how frequently I make mistakes when writing on paper. There’s a reason why I stick to cheap paper when jotting down ideas, and why a Moleskine notebook is wasted on me.
But when the Notability-App introduced their second Calendar-Addon, I got the idea to simply create my own digital bullet journal for a tablet. The idea of using a PDF calendar instead of a paper one does have merit — on a tablet that comes with a Pencil.
Advantages of a Digital Bullet Journal on a Tablet (with a Pencil)
Especially on a tablet there are multiple advantages:
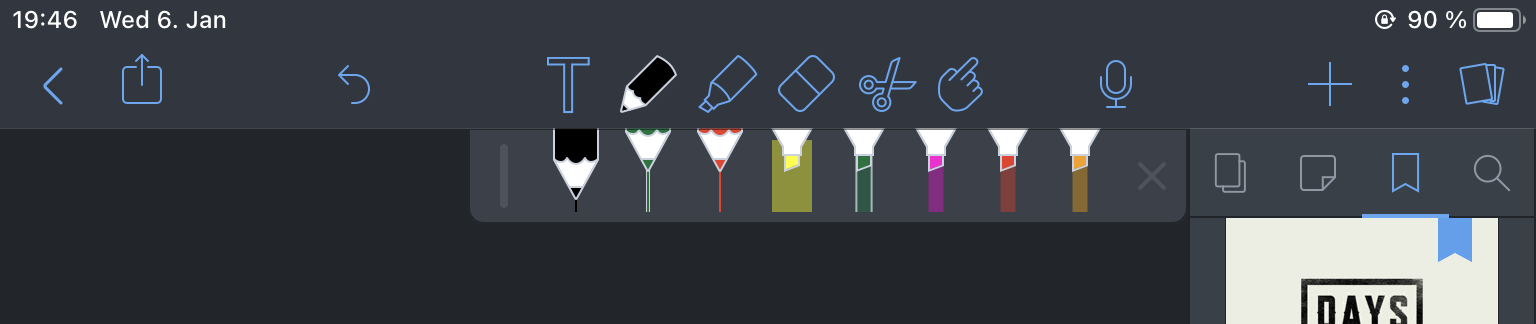
- You can write by hand with the Apple Pencil — allowing you to zoom in, move, edit, etc. your text as often as you like.
- In contrast to digital calendars (e.g., the Apple Calendar), or Task Management Tools (e.g., OmniFocus), you have much more flexibility when it comes to annotations, sketches, and the like. Just doodling on the page, writing down some insights, all possible. Note that this does not mean to replace both tools with a digital bullet journal, but use each tool for its strengths.
- You can easily create the pages themselves — the underlying PDF document — with Keynote. For my iPad mini 5 I did set the measures of the “presentation” in Keynote to Slide Size Custom with 1536 x 1920. Then you can simply create pages, export them (not print!) to PDF and that’s it. Not a DTP program, but not that far off (Master Pages = Master Slides, Object Lists, etc. pp.). And much quicker to use.
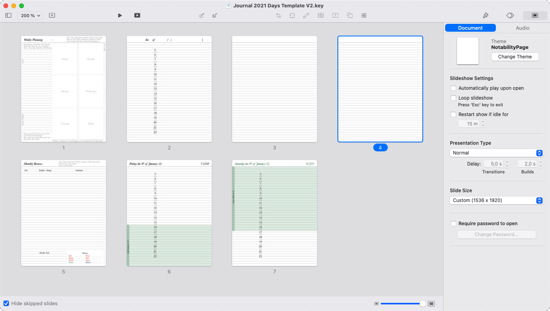
Creating Journal Pages in Keynote. - Each page is treated individually, allowing you to change, copy, delete, or rearrange the pages. just select the Pages View (whatever it is called, top right icon, see image below), tap on a page (twice if not previously selected) to interact with it.
The Page View (or whatever it is called) is accessible with the icon in the top right corner (beneath the battery symbol). Selection of views (all pages, annotated pages, bookmarked pages, search) is below. You can bookmark pages by tapping on the — here blue — symbol in the top right corner of a page in the Pages View (white with black borders if not bookmarked). - You can add divider pages to make navigation easier, especially with the Pages View open. You can see “All Pages”, but also see only pages with handwritten “Notes”, or only pages on which you have set a bookmark (“Bookmarks”). There is also a search function. I recommend bookmarking the current day and the divider pages (plus perhaps some project pages you frequently need).
- You can copy-paste whole pages including your handwritten annotations — e.g., you have day pages and some parts of the day are always the same.
- You can copy-paste only the page background — e.g., you have use your last “Notes” page that contains lines in the PDF document itself, so you can simply copy the page itself without your handwritten annotations.
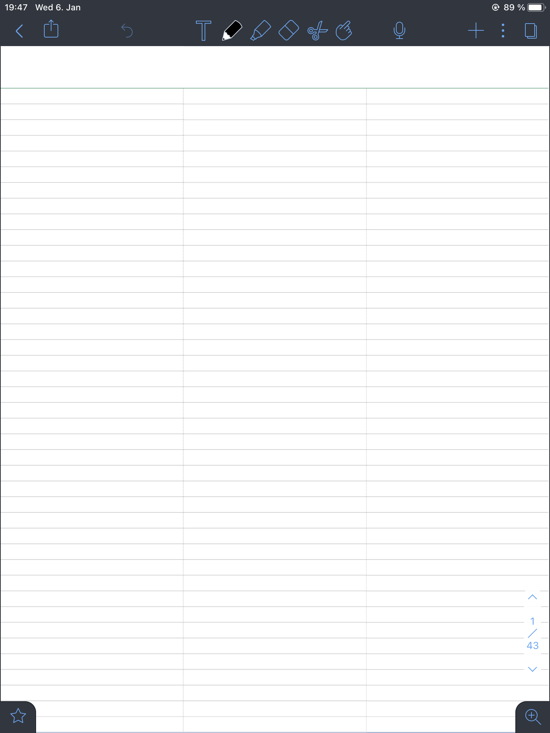
One of my (blank) notes pages. Created with Keynote. The three columns are useful for quickly zooming into the page and writing notes with a bit more space to write in. - You can copy only your handwritten annotations on a new page (just select them with the lasso tool and select copy) — allowing you to copy-paste your usual events during the day on a new day page. For example, you mark when get up and walk to work on a daily calendar page, just copy and paste it on all following calendar pages. Advantage compared to having it in the PDF itself — you can change it if something breaks your usual day rhythm.
- You can add and remove pages easily. Just copy-paste them from another journal or add PDFs and import them directly into the journal itself. Great to add Day Pages (no need to add 365 pages if you plan — in detail — only a week in advance) or transfer used pages to another notebook (does not clutter your journal). Essentially, you have a spiral bound journal which you can open. If you transfer pages between two Notability notebooks, consider putting the iPad in landscape mode, then swipe from the left border to open the Note Switcher, press on the three vertical dots and select either “View On Left” or “View on Right”. This way you see two Notebooks at the same time and the Page View (top right icon) changes depending on which Notebook you tap.
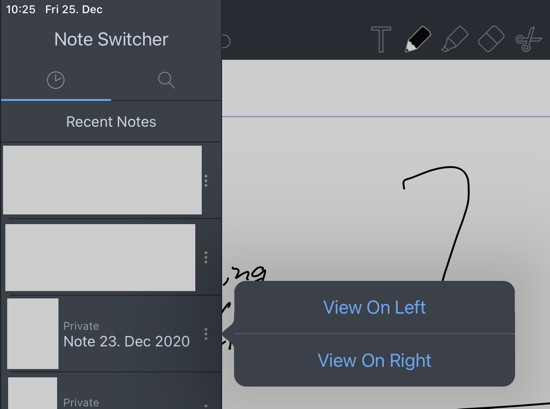
The Note Switcher allows you to quickly open to Notability documents at the same time. - You can easily add photos and screenshots, e.g., if you also want to use it as a journal and add a specific photo of the day, or of a meal. You can essentially replace a diary with it (or a digital diary like this Keynote Bullet Journal which was made for reflection, not for planning).
- Oh, and given its sync feature and Mac App, you can also edit the Journal on your Mac. Nice for copy-pasting pages or exporting them as PDF.
Usage
Functionality alone does not make a good bullet journal/calendar. I think a good bullet journal should be a pincer consisting of high-level goals (one side) and an accurate assessment of what a person is doing each day (other side) — with the aim to continuously improve working for these goals. But to reflect well and make the right decisions you need accurate information. Planning a day is one thing, what actually happens … can change even before you leave the bed. And I find it hard to remember what I actually did do even a few days later.
So I am currently trying out the following approach (work in progress, only partly tested):
- Goals/Bucket List: I started with writing down all the things I want to do this year. Then I removed a lot of things or put it into a nice-to-have category. Planning fallacy is a thing. I put the remaining goals into my journal (still a work in progress).
- Project Pages: Some goals can be translated into projects which can be completed (e.g., write another book, start driving a motorcycle), so each project did get a project page (only a handful of pages). It allows me to have a place to get a high-level view on the project and estimate the amount of work. The content is also not fixed — you can change it as often as you want giving that erasing in a digital notebook leaves no traces and does not damage the paper. More like a whiteboard actually.
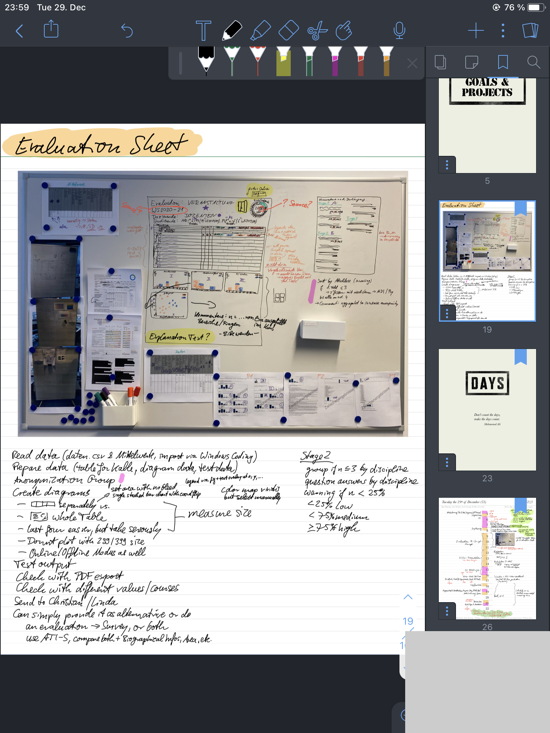
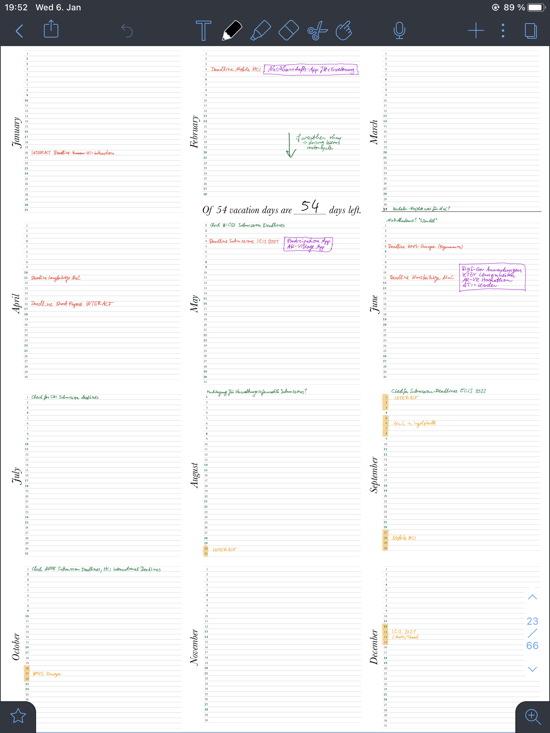
A project page — a photo of a whiteboard was inserted later to have the information available (zoom!). BTW, you can easily continue writing on the board — by writing on the image in Notability. Even the highlighters work (e.g., “Explanation Text?” highlighted in yellow on the image, lower part). In the Pages View on the right you also see — very small (privacy, sorry) — an annotated day (second iteration of a day page, with the days in the horizontal middle). Oh, and you see the template pages — the Pages View is on bookmarked pages only, making navigation quick and easy. And yeah, I used the “Days Gone” computer game logo for the “Days” template design. - Year Planning: I wrote down the fixed major dates of the year on a “Year Page” (mostly conference deadlines and the conferences themselves). It provides an overview how they were spaced during the year. It allows me to plan work and identify phases when more time is in my control. And yeah, it’s one page with all the days of the whole year. Looks too small and unreadable, but with digital, you can zoom (even more easily on a tablet). The idea is to see the year at a glance with major deadlines (e.g., of conferences).
Year Planning page — work in progress. Tiny text, but readable once you zoom in (in Notability, not here, these were only conferences at that time, but still, privacy is a thing). - Planning the Days with a Day to Plan: When it comes to planning the days, e.g., moving projects/goals into actionable tasks that I actually do, I think in weeks when it comes to planning and months when it comes to reviewing (weeks are too volatile).
For me the week starts on Saturday, after my version of a (Media)Shabbat is over (I need to go online to effectively plan the week). While I use that day to relax — usually completely offline, great to time to read and think — in the evening I can go online and review and plan the week. The goal is to review the last week and plan the next week, which means adding the pages for the next week to the journal and (afterwards) removing the pages of the last week form the journal (putting them in another Notability Notebook until the month is over). - Scope of time-independent task planning limited to one week: Experience has taught me that long term detailed *task* planning makes little sense. I don’t mean making appointments for meeting or the like, which do make sense. But planning on which day and during which time to do which time-independent task weeks in advance — sorry, but life is too volatile for that kind of planning. I think task planning is like a weather forecast. It works for a week, but then it becomes unreliable. So specific project tasks can be assigned to days a week in advance, but not longer than that. One advantage is that you only need day pages for the next week, not more.
- Planning the Week
- Uses Weekly Planning Pages: A page with a column to write down the most important tasks for the week (based on Projects/OmniFocus Tasks/Calendar/etc.) and six spaces to insert the pages with appointments for each day of the week (excluding Saturday, as that is the day I do the planning). Inserting the pages is pretty easy, just do screenshots of the six day pages and add the images, resize them, done. Tiny and hard to see, yes, but a) you can zoom, and b) it’s enough to see how much time remains during the day without the appointments (meetings, teaching, etc.). You can also write/highlight on the images, e.g., when you decide which tasks to do on which days, you can block that time for planning purposes.
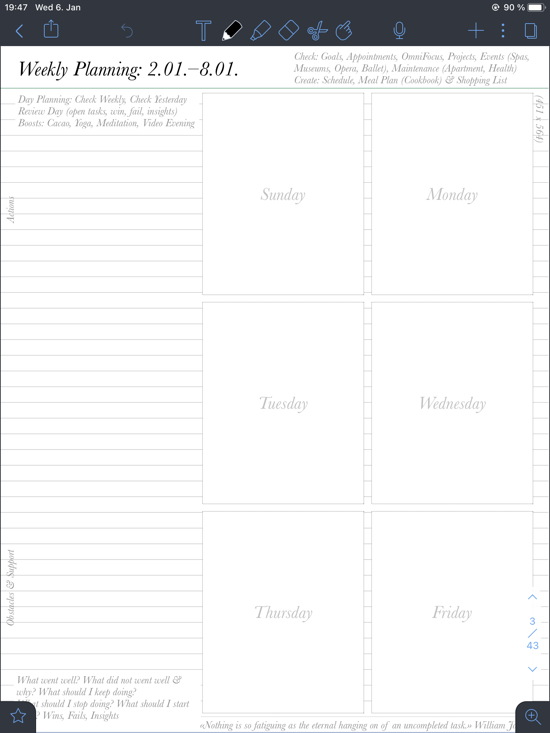
A weekly planning page — with some reminders in light grey. Day pages are added to the placeholders. - Appointments: Unfortunately, I am not in a position to skip appointments, so these come first. On Saturday, I add them to the Day Pages (scope: Sunday to Saturday). During this manual process, I also check whether I need to prepare anything for these appointments. If possible, Information is either in the Apple calendar entry (e.g., place, agenda) or in a file in DEVONthink (I just make sure I find it easily and everything is in order).
- Review of the last week: Given the entries and notes on the last Weekly Planning Page and the day pages of the last week, look for tasks that are still open (keep/kill?), insights, ideas, etc. If you had an idea during the week, you might as well use it. Part can be added (copy-paste function, never cut-paste, leave traces what you postpone again and again) to the Weekly Planning Page, others end up in a task manager (like OmniFocus). Also a great time to reflect — what went well? What could have been better? Or to use three questions (I think from Asian Efficiency(?)): What should I keep doing? What should I stop doing? What should I start doing? Jot down your thoughts on the current Weekly Planning page and review them in a week.
- Projects: Long-term projects, e.g., conference submissions, qualification works, etc. come next. Usually it’s already covered by appointments, or it leads to appointments. Sometimes they result into tasks, which — if time-independent — can be jotted down on the Weekly Planning Page. It’s also a good time to check online for interesting events to further some continuous projects (e.g., to become better in photography).
- Tasks: OmniFocus holds my tasks, sorted by projects. So it’s a great moment to use the OmniFocus Review feature or just go through each project and check the tasks. Anything that should be done in the week? Ends up as a note on the Weekly Planning Page.
- Any other Tasks: Maintenance tasks and the like can also be added to the Weekly Planning Page.
- Matching Tasks to Days: The Weekly Planning Page has space for the following six days (Sunday to Friday) and it’s easy to add screenshots of the Day Pages to it. You see the next six days, including how much time is left given the appointments on the pages, and when it is available. Matching should be simple now, if there weren’t (likely) too many tasks that take too much time. With the goals in mind — what do you do when? And what do you put back? And what do you have to stop trying to do? Not a comfortable situation, but it helps to see whether you spread yourself too thin. BTW, I try to plan only half the available time during a day, and even that is likely too much. There is still too much friction every day to plan every minute. At least, without having a staff. But yeah, first assign the tasks you want/can/must do to the available spaces on the Weekly Planning page, then, when you have found a working solution, add them to the Day Pages (either directly in the time slots, or as tasks, if you want to plan the day in the morning).
- Uses Weekly Planning Pages: A page with a column to write down the most important tasks for the week (based on Projects/OmniFocus Tasks/Calendar/etc.) and six spaces to insert the pages with appointments for each day of the week (excluding Saturday, as that is the day I do the planning). Inserting the pages is pretty easy, just do screenshots of the six day pages and add the images, resize them, done. Tiny and hard to see, yes, but a) you can zoom, and b) it’s enough to see how much time remains during the day without the appointments (meetings, teaching, etc.). You can also write/highlight on the images, e.g., when you decide which tasks to do on which days, you can block that time for planning purposes.
- A Day in the Week: A Day page now contains the appointments (some with notes) and either time-independent tasks assigned to specific time slots or as tasks you still have to assign. Given the written record you have something to happily cross out when you do it, or to reflect upon if you don’t do it. The design of these pages did change, the image below shows the third iteration (timeline changed from left side to middle to 1/3 in; design changed as well). The idea is to plan the day on the left side, jot down what actually happened on the right side (1/3 in to 2/3 in), and have some space for notes, tasks and insights on the last 1/3 of the page.
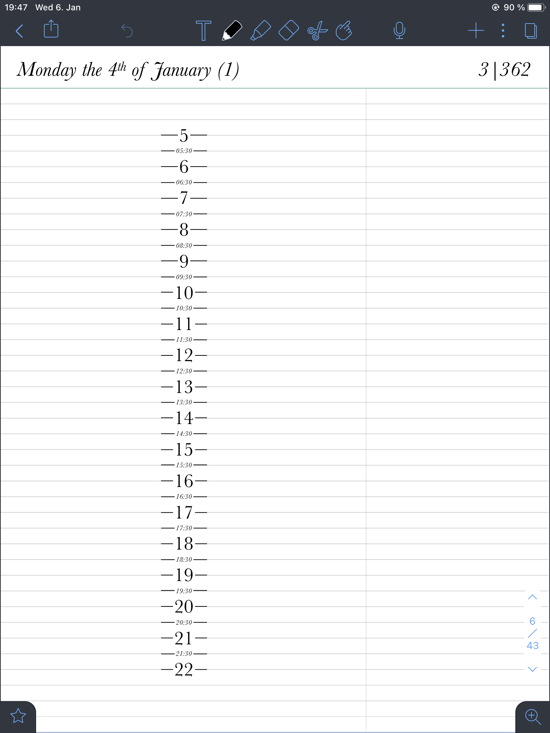
A Day Page. Yeah, I get up at 5 am (changed it a few months ago, and like it). The dates are generated via a Numbers spreadsheet. In brackets is the week number (European style), on the right the days that have already passed and the days that remain (including the current one). 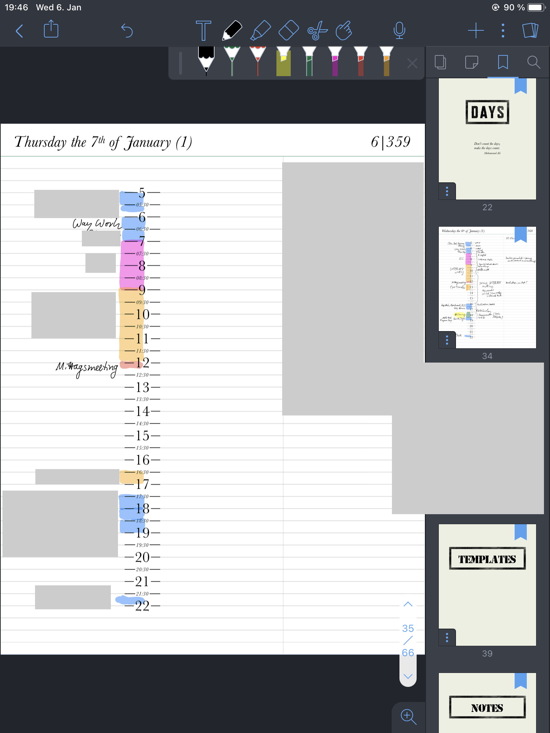
A day page with some annotations. I am trying out a color code for the scheduled events/tasks. Great thing with digital writing — you can select the highlighted elements and change the style, which includes the color. Try doing that with paper. - Monthly Review: Once a month an opportunity to go through the last month (removed pages are still available in another Notability notebook and can be exported into PDF then). The current month page is included in the Bullet Journal Notebook. The idea is to have a look at the goals and what I did during the month to achieve those goals. Also to check the finances and set some tasks for the months (e.g., maintenance tasks).
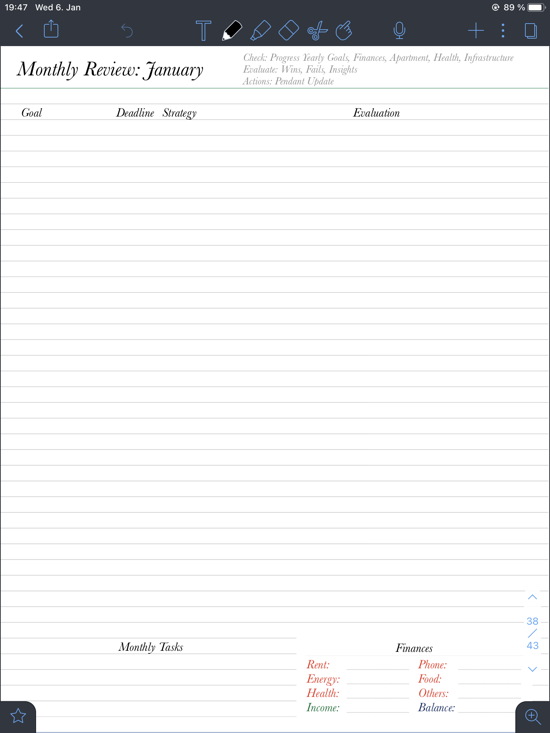
The current idea for a monthly review page. Likely to change, but I want to put some reminders on the page, and direct the focus on goals.
There also are a couple of other pages I try out at the moment, among others:
- Usage Reminders / Instructions: Usually a bad sign if it’s not self-explaining (or in notes on the respective pages), but it’s a new approach for me, and I tend to forget ideas of how to use it.
- Divider Pages: “Goals & Projects”, “Days”, “Templates”, and “References”. Bookmarked for easy navigation.
Caveat
Caveat 1: What the Digital Bullet Journal is NOT
As a first caveat so far (or clarification), I think a digital bullet journal should NOT be used for the following:
- It should not compete with project management tools like Kanban Boards or the like. Or project overviews which are better kept in an Excel or Numbers sheet (e.g., I use one for qualification works, and the calculation functions are really useful like days left, etc.) And yeah, if you could integrate it into Notability that would be nice, but it would likely become bloated.
- It should not compete with task management tools like OmniFocus. The Bullet Journal should break down goals into projects and those into manageable tasks you actually do, and support reflection to allow you to find out why you did not do them. But for collecting tasks, esp. doing it very quickly, OmniFocus is much, much better. Even for project tasks — the amount of detail would be too much for the Journal as the space on a single page is fixed and resorting tasks becomes a nightmare quickly.
- It should not compete with a shared calendar. It is too personal and it lacks the Internet connectivity. We use Microsoft Exchange at work (calendars are visible, but only when times are blocked, not why), which allows others to suggest times for appointments and send invites. Also, the journal covers only the next week, so the calendar remains useful.
- It should not try to replace dedicated apps like a sports app that writes data into Apple Health or other tracking/logging apps. Why track something manually when an app can do it for you? Without costing you any attention, time, or effort. Just make sure you review the summaries (doing a screenshot every month and adding that image into the journal is an option, though).
Caveat 2: Hopefully Notability does not fuck up
While the same solution is (mostly) possible with other apps (e.g., GoodNotes), I really hope that Notability does not fuck up the app in the future. They did have problems with extreme battery drain (likely due to text recognition in the background, or some other out-of-control-task), and yeah, it still does draw a lot of power. But here’s hoping it works out.
Preliminary Conclusion
As written, at the moment it’s just something I try out. Some things will likely change. But so far it’s fun. It takes about 10 minutes in the morning to plan the day, and the ability to make quick notes during the day is really, really useful. And yeah, the ability to comment on the day as it happens — something iCal nor OmniFocus allow (market niche, guys!) — that’s … waow.
But whether it will work for me — or for you — long-term is an open question (with annotating and reviewing, it will at least become clear quickly).
Update
Seems to work out well. One thing I really like is the day pages, with Planned day left, then the timeline of the day in hours, Actual day in the middle, and Notes (mostly: Tasks) right. Didn’t know I missed this from the paper calendar days, but it is really useful. Especially writing in the tasks for the day, adding numbers for the order you want to tackle them, and crossing them out with a small green highlighter. You actually see what you have done during the day while the day advances, compared to OmniFocus (still my projects/task repository), in which the done tasks vanish. Really, really helpful.
Update 2: Keynote pages online
After multiple requests I have put some of the Keynote pages online.