Applying computer technology is simply finding the right wrench to pound in the correct screw.
Unknown
I was asked how to format footnotes when using Scrivener, which led me to the question how to preserve formatting styles when compiling Scrivener into Microsoft Word documents.
While Scrivener is the best writing software I have ever worked with (and still work with), it is not made to format texts. The focus is on writing. Personally, I highly recommend using Scrivener to create the text, edit it, put out draft after draft until the text is “finished”. And then compile the text and use another program to create a nicely formatted text.
While I used InDesign for my PhD thesis, many users will probably want to use Microsoft Word or a similar program. Personal hatred aside, Word does have a few strengths. And if you use a lot of footnotes and want more control over them, you might want to use it for the final version. Not to mention that many people still use it, so if you want to give it to your supervisor, you probably have to.
Unfortunately, Scrivener does not seem to use paragraph and character styles for footnotes, which is a problem when you move the text to Word. Paragraph and character styles allow you to quickly change font characteristics (like font style, font size) for specific text elements (like headers, footnotes) in the whole document with just a few clicks. Not to mention they help you to keep the style constant and aid in navigation, are needed for automated table of contents, etc.
But as far as I can see, while you can create style presets in Scrivener, they are not retained when compiling the text for Word. You keep font style and size and the like, but that’s it.
So here’s a workaround. If you found an easier way than this workaround, please drop me a line. It will make this workaround obsolete (meh!), but you’ll help future readers (yeah!). In any case, Word’s advanced find and replace feature is worth a look.
Due to the question, I focus on footnotes, but it applies to other characteristics like chapter headers as well.
Footnotes in Scrivener
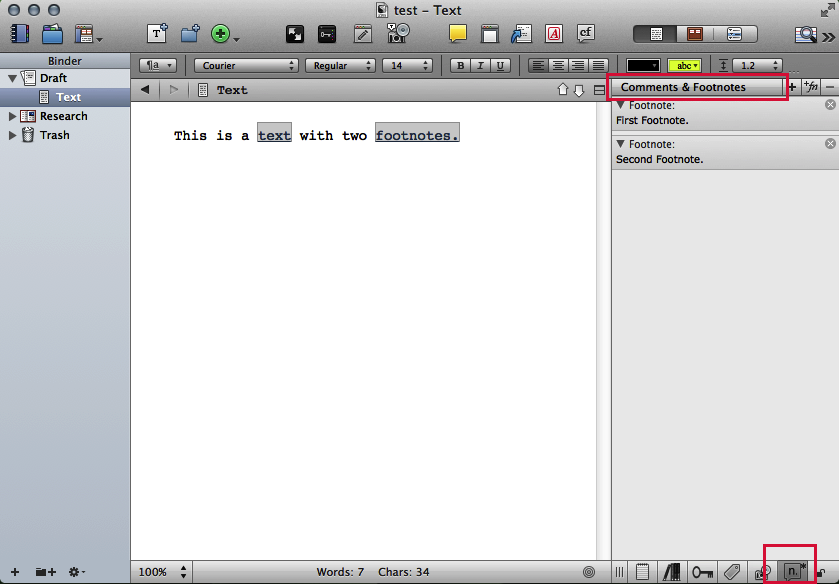
Scrivener supports inline footnotes and footnotes in the inspector window (via Format – Footnote or Inline Footnote; you can also customize the task bar — it’s the “cf” icon). Inspector footnotes are displayed in the Inspector window on the side (View – Inspect – Comments & Footnotes). If the inspector is visible, click on the “Comments & Footnotes” Tab (bottom of the Inspector Window, that “n.* speech icon”). Inline Footnotes are displayed in the text window itself but visually separated. It does not matter which style you use. You can also easily change all inline footnotes to inspector footnotes and vice versa (via Format – Convert – …).
Personally, I think that footnotes (and comments) in an inspector window are one of the main strengths of Scrivener. You can fold in the text and if your annotation/footnote is longer than a page, it does not matter. Additionally, clicking on the footnote/comment in the Inspector window highlights the corresponding place in the text — much better than the lines in Word.
Footnotes in Microsoft Word
Giving tips for Word is difficult, as the versions differ a bit. I do not use the “Ribbon”/menu band and my version is in German. However, I think that the advanced find and replace function should work in most cases.
To get the Text from Scrivener to Word select “File” — “Compile” in Scrivener. You make do a lot of settings here, but we focus on footnotes. The problem with this export is that the footnotes are not set in a different formatting style. Either I am missing something obvious here, but it seems that Scrivener can export the text with all formatting elements (font, size) but not with the formatting styles. I only get “Standard” as formatting style in Word. However, if you use font characteristics in Scrivener (like font name, size, italics/bold, etc.) that are specific for a certain formatting style, it’s possible to use Microsoft Word’s Advanced Find (and replace) to quickly assign these paragraph or character styles in Word.
1. Compile from Scrivener to Word but override the footnotes font with a font you did not use anywhere in your Scrivener document.
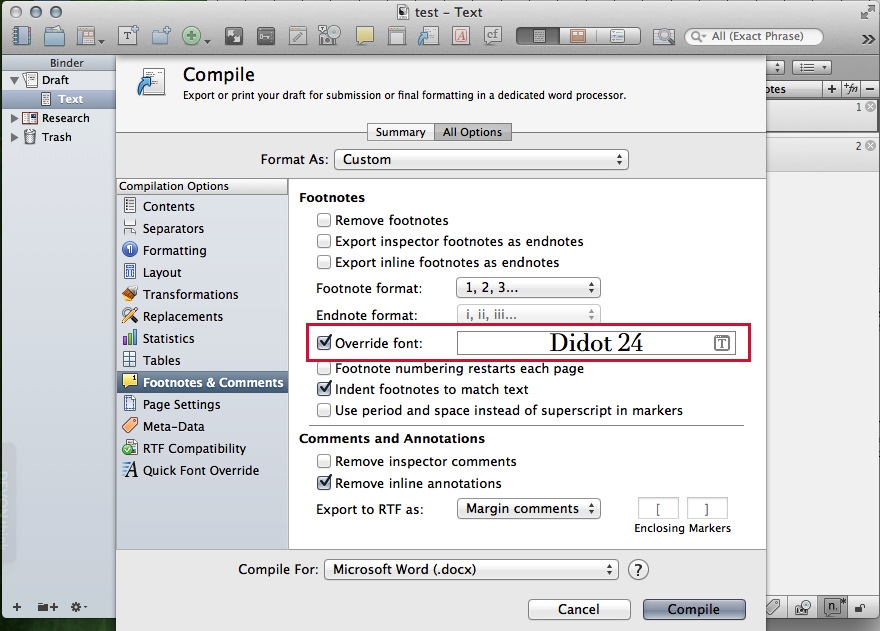
This separates the footnotes in Word by the used font and thus allows Advanced Find to identify them.
Note: You can switch between footnotes and endnotes here via the “Export inspector/inline footnotes as endnotes”.
2. Open the compiled document in Word
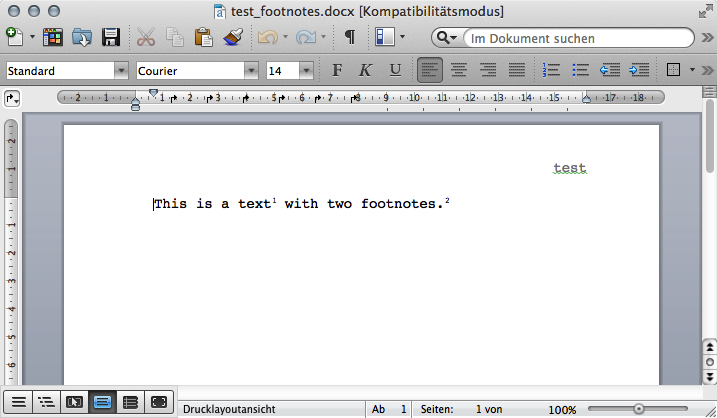
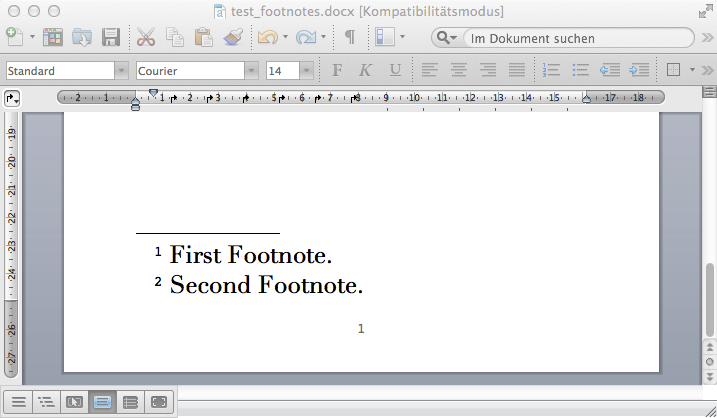
Unfortunately, the text is all in the same formatting style (“Standard”). However, the footnotes are in the selected font and font size (here: Didot, 24pt).
3. Find out which formatting styles are used for footnotes
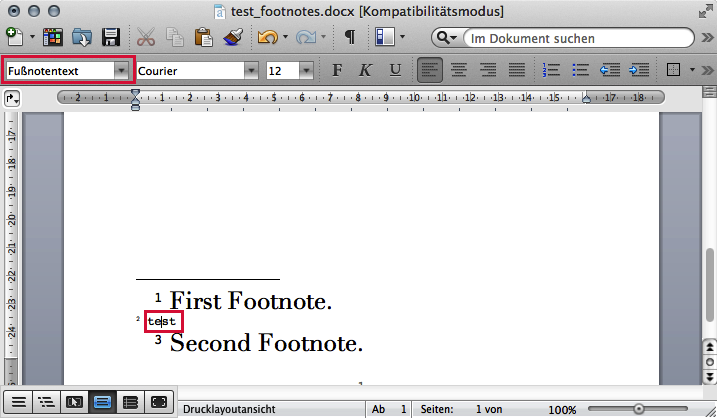
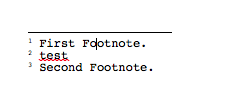
First insert a footnote in Word (“Insert” – “Footnote”) to find out which formatting style is used for the footnote and the footnote numbering/character (the superscript in the text). Simple write some text, then look at the formatting style.
Then highlight the number of the footnote and look at that style as well.
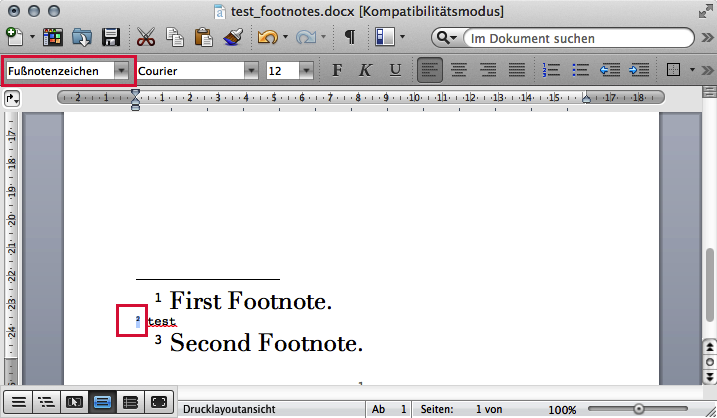
In my version the formatting styles are:
- “Fußnotentext” for a footnote text (paragraph style)
- “Fußnotenzeichen” for the footnote number/character (the superscript reference) (character style)
Like the names say, paragraph styles apply to the whole paragraph and there is only one paragraph style for each paragraph, while character styles apply to characters within a paragraph. You can have different character styles within a paragraph. (German => English: Fußnote => footnote; -zeichen => mark)
4. Use Advanced Find and Replace to apply the footnote formatting
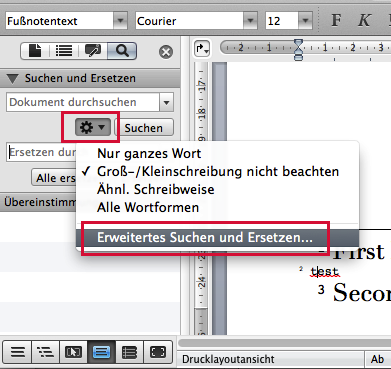
In earlier versions Advanced Find was somewhere under “Edit” – “Find” – “Advanced Find”, but given Word, there are multiple ways to access it. For example, if you select the search dropdown menu you should be able to access it as well. Look for “Advanced Find & Replace…”
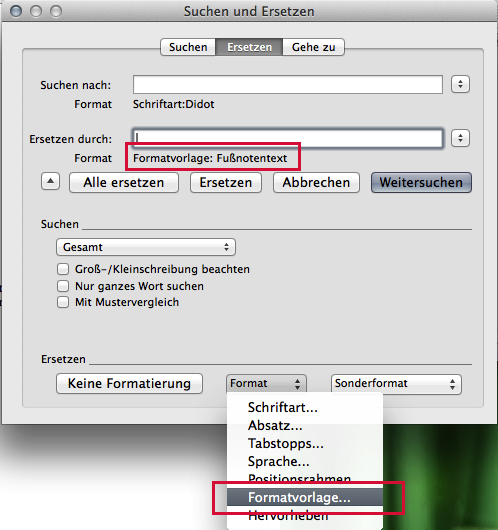
You are looking for something like this (sorry, in German, in English it’s “Find and Replace” or “Advanced Find and Replace”):
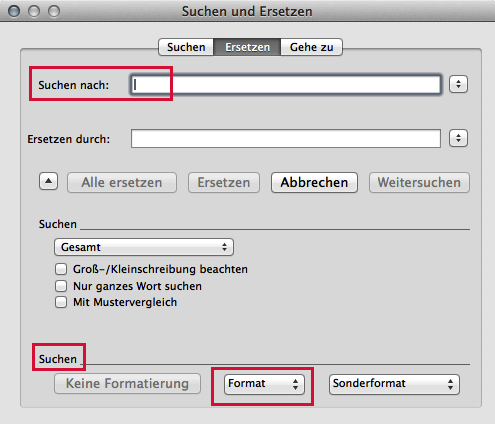
The great thing about Advanced Find and Replace is that you can search for almost any characteristics of the text and replace it with almost any other, including formatting styles. You need to use the “Format” Dropdown-Menu to access the desired characteristics of find and replace separately. The Dropdown menu at the bottom applies to Find or Replace, depending in which text field you have clicked. You might need to click on that triangle to see all options in this menu first.
Given that the footnotes font in Scrivener were overriden with Didot, 24pt, that’s our target. The font name is sufficient here (used nowhere else in the document but for the footnotes).
First, search for font Didot and replace with the formatting style used for the footnote text (use replace all)
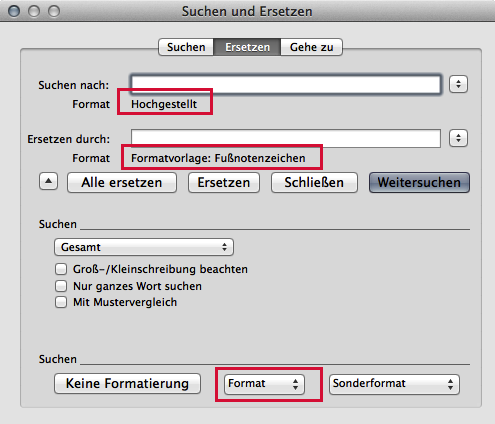
Next, you want to assing the style for the footnote number/character (the superscript reference).
So, remove the current search/replace settings (should be something like “No formatting”, here it’s “Keine Formatierung”) and:
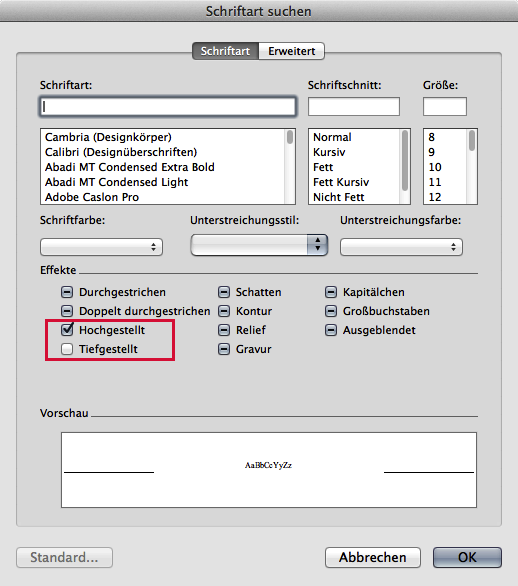
Search for superscript (via font, click only on “superscript”; hier “hochgestellt”) and replace it with the formatting style used for the footnote number/character (the superscript reference; here “Fußnotenzeichen”)
Careful here: I assume that you have used superscript no where else in the text (careful with formulas, but if you use them a lot, I’d assume you use LaTex). If you do use superscript somewhere else, then additionally limit the search. It’s easy with the footnote itself — the whole footnote is already formatted as footnote-text (paragraph style). So add that formatting style in addition to superscript in find. However, you also need to add this character style to the superscript reference in the text itself and that is in the standard text. It should be possible to differentiate here if you use a different font for the superscript text in Scrivener and then search only for superscript in the default font. You can later replace the different font for non-footnote-superscript to the standard font (also via Advanced Find and Replace).
Now, the footnotes should be in the correct formatting style. Highlight the number/character and compare the formatting style with the Word-inserted footnote. Do the same for the actual footnote text itself. However, the text in the footnotes likely looks different from the footnote inserted in Word. The Scrivener footnotes are still in the override font (here: Didot, 24pt).
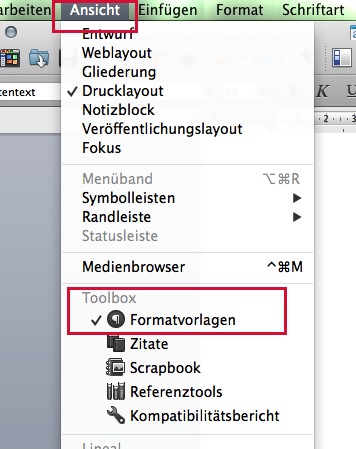
5. Use the “Toolbox” to update the endnote text style formatting
Not sure whether it is also called “toolbox” in English version of Word, but there is an option with the formatting styles to update them. If you have applied one formatting style, but then changed the text size or style or whatever directly, you have added other font characteristics to the text or overridden them. Word can remove these “deviations”. I think it was easier to find in earlier versions, but in my Mac 2011 version, it’s accessible under “Ansicht”/”View” — “Toolbox”.
Click on the footnote text(!) you have inserted with Word — the cursor must be in that text. Then go to the toolbox and scroll down to the formatting style for the footnote text (here: “Fußnotentext”), click on the paragraph mark on the right side of that style (turns into a triangle) and select that you want to update it to this selection.
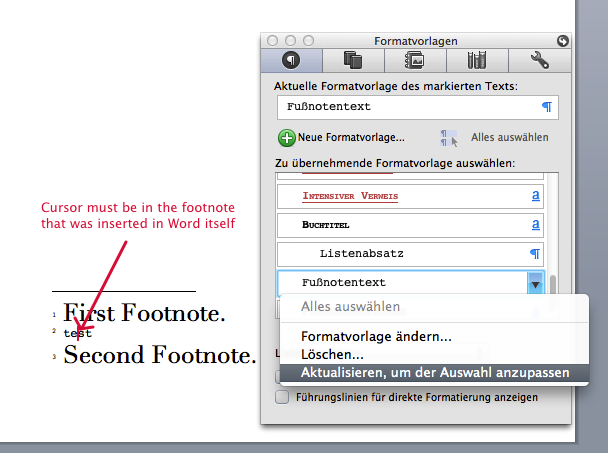
This should restore the formatting for the footnote text to the default values everywhere in the text.
Now you should have the footnotes in Word in the correct formatting. If you change the style for footnotes or footnote marks, it is applied in the whole document. For example, if you want the footnote marks to be larger, you can now do so easily.
Using this Process for other Paragraph/Character Styles
You can use the same process for all other kinds of styles as well. If you use a specific header style in Scrivener (e.g., American Typewriter, 18pt for header 1), search for these characteristics in Word and replace it with the desired formatting style.
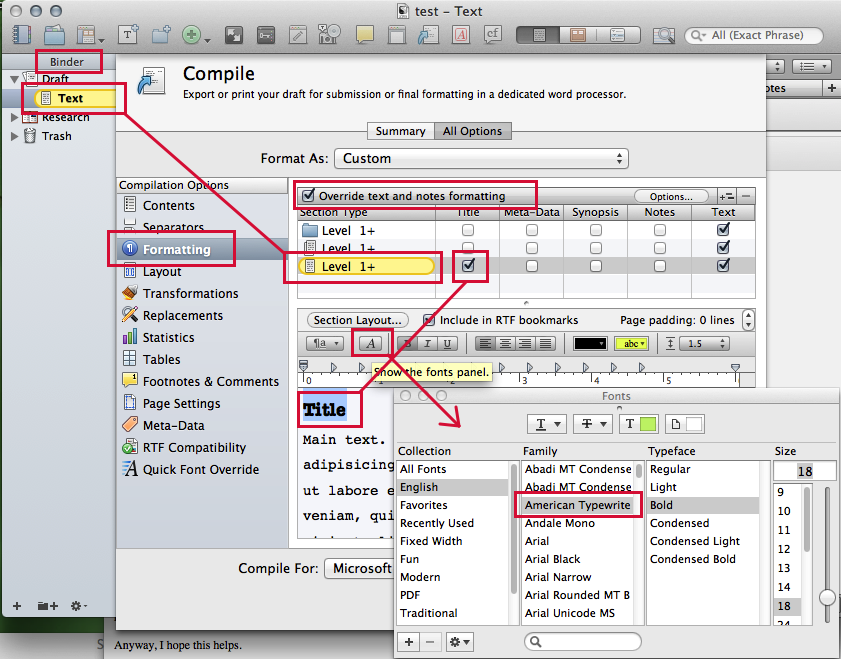
You can do this via the “formatting” options under compile. You have to override the text and notes formatting (checkbox) and select the correct level (list below). When you click on the level, Scrivener highlights the corresponding files in the Binder. Use this as your guide. Note that you have to use the “5. Use the “Toolbox” to update the endnote text style formatting” with headers as well. Instead of a footnote, use the paragraph styles for headers and restore all changed Scrivener headers to the Word settings.
Note: Careful with Font Names
Be careful which fonts you chose and whether the same name is used in Scrivener and Word. For example, I tried out American Typewriter, but it ended up as “AmericanTypewriter” in Word (the space was missing). If a find and replace does not find anything, check the font name. Best use font names without space. Otherwise, click on the font name as it is displayed in Word and copy paste it into the font name field (here: AmericanTypewriter has to be found, but you can only click on “American Typewriter” — you have to manually remove the space or copy & paste the name).

Concluding Remarks
This is a work-around. I hope there are better ways to preserve the formatting styles with Scrivener. Perhaps in another version, or perhaps I have missed it.
If this really is the only way to preserve formatting styles from Scrivener to Word, it would probably be best to create a compile format preset in Scrivener which overrides the footnotes and headers and combine this with a Word Macro which uses these advance find and replace commands. For footnotes, there likely is a way to access them directly via macros. After all, Word correctly recognizes the Scrivener footnotes as such (inserting a new one via Word automatically updates the numbers). It’s just the paragraph and characters styles that are not applied. However, my knowledge and love of Word Macros is insufficient for this task. If you know how to write them and want to invest the effort, drop me a line. I’d love to link to them or put them online here.
BTW, looking around after writing this posting, I found this series Spencer Seidel which uses Advanced Find and Replace to format the heading styles. He uses prefixes instead of text characteristics — also quite ingenious.
- Spencer Seidel — Scrivener to Word with Style Pt. 1
- Spencer Seidel — Scrivener to Word with Style Pt. 2
- Spencer Seidel — Scrivener to Word with Style Pt. 3
The macro described in part 3 is very interesting. And if you are only interested in applying Word-paragraph styles for headers, given the ease of use when using a macro, the way described there would make it easier.
Anyway, I hope this helps.
I’ve discussed with Keith why Scrivener doesn’t support paragraph and character styles. It doesn’t because the text tools that OS X supplies developers doesn’t support them. Only larger software companies can afford to build their own work-arounds.
What follows is my own interpretation of why this is true.
* First, the idea is incredibly stupid. Word added paragraph and character styles back in the late 1980s. Apple wants to give the impression that its support for rtf somehow incorporates Word support. It doesn’t.
* Second, what OS X does support is a concept of how to do word processing that was used by word processing programs like WordStar in the early 1980s–rulers and formatting bars. I know because I used computers back then. For those doing their math. That means OS X’s word processing support is over thirty years out of date. That’s the era of a command-line interface. Dreadful!
* Third, up to version 5.1 for the Mac, Word actually encouraged the use of styles by making them easy to use. Since then, with the bloatification of Word, using them is has become clumsy, most Word users don’t even seem aware styles. That means that there are few people who use word processing who’re aware of just how much better and versatile assigning styles to text is. And using styles in an app like InDesign is an absolute delight.
* Fourth, Apple is being very, very, very, very stupid not integrating styles into OS X and iOS. That’s because styles can be used to assign meaning to groups of text, i.e. this is a first level heading. That’s call semantic markup and is described here:
http://en.wikipedia.org/wiki/Semantic_markup
If you’ve used HTML or epub, you know what that means. That assignment of meaning is absolutely necessary to handle text as it moves from being viewed on a large 24-inch display to an iPhone’s screen.
* Fifth, if the designers (i.e. Ives) at Apple weren’t so obsessed with silly and meaningless little artistic tweaks to their operating systems (i.e iOS 6 to iOS 7), they’d realize that they need to spend more time on making the internal guts of the software work better. One illustration is that text should move seamless from a large-display Mac to an iPhone, displaying attractively on both.
The fact that can’t happen is a major failure on Apple’s part. It’s creating desktop/laptop and mobile devices that, when it comes to text, don’t communicate well with one another. For a rough parallel, imagine that a tune you downloaded and played on your Mac would play two or three times faster on your iPhone. That’s the folly of attaching font size to text rather than meaning. It makes translated how it should display on different devices difficult.
And in the process, it makes transferring text from a OS X-dependent application such as Scrivener to more full-featured apps such as Word or InDesign more difficult.
Hoi Michael,
thank you for the comment, that explains a lot. And yup, I totally agree that Apple needs to focus more on “it just works” instead of “it looks cool”, after all, I did make the switch to Apple to do just that — concentrate on work. I think earlier style was more or less in balance with substance, but today, Apple is style over substance (still better than the Windows world). Love the ringtone analogy.
Hi Daniel
Thank you so much for your article :). I discovered Scrivener a couple of days ago and was immediately in love. However, while evaluating whether Scrivener would be a useful tool for my PhD Thesis, I stumbled upon the whole formatting style issues, and was already fearing I’d have to stay with dreadful Word :).
But thanks to your workaround, I’ll save a ton of time when it comes to compiling the final draft (as my supervisor and publisher both demand .doc)
Thanks again and let’s hope Apple fixes its word support (though I fear they’re quite busy making everything white and flat at the moment…)
Thank you for the feedback 🙂 Best try it out, given that there are different Word versions on different OS’, but it should continue to work in the future. If this stops being possible, e.g., because a new Word version works differently, it should be possible to bypass that issue by saving it in an older version (one feature where Word is surprisingly good).
Thanks for your article. I’m getting near the final stages of my Ph.D. thesis, written in Scrivener, and the thought of formatting everything in Word is killing me. I have upwards of 100 pdfs that need captions placed precisely. I’ve recently dabbled with Indesign, and am contemplating your technique of formatting the dissertation there. Do you have any articles on this or general advice? I don’t have time to spend ages learning a new program, but I know how to make a basic brochure in Indesign. I wonder how much more I’m going to need to format footnotes, captions for images, etc.
Hmm, I don’t think I have ever written in detail on using InDesign for a PhD. But I made use of Layers, started new Sections in the pages window (IIRC), used one file for all, embedded the graphics, made use of paragraph and character styles, made sure I knew the format I had to print the thesis in advance and concentrated only on setting it. I think I started with copy-pasting the text into the template (autocreated new pages), had “Insert xxx here” in the text and then started from start to end inserting the images. Given that there were no changes needed anymore with the text I could concentrate on creating a good-looking (= readable) thesis this way. I would not recommend starting this process unless you have gotten your feedback and the changes are accepted. As for footnotes I think I used the InDesign function. As for captions I did those manually (with paragraph styles), which, IIRC I then used in a second (figures) and third (tables) table of contents. Hmmm, that’s it on the top of my head. I could write a posting about it — but currently I cannot promise anything. I used InDesign because I used it for just-for-fun books and found it more stable and practical than Word. It’s doable, but you will curse while doing it. But whether you will curse more or less than when using Word, I cannot say.
Regarding the use of InDesign, check out this posting for further information and an InDesign template.
Hi there. Thanks for a great article. I have a question. How do I set the footnote number font size to a much smaller size than the main text as the line spacing is double when there is a footnote in the ebook? I’m not sure this is possible, but I’d be grateful for any help.
Huh … I’d have to play around to find an answer, given that I wrote the posting a while ago. Can you send me a Word file with some text (doesn’t have to make sense) and a footnote? I’m guessing it should be possible to change the format style of the footnotes to change line spacing in general, but I’d have to play around. eMail is under Imprint.