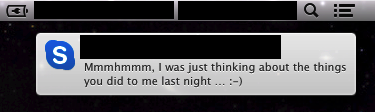
The kind of Skype message you really do not want to get when your screen is mirrored to a projector in a public setting
If you ever sat in a presentation where the presenter’s private life or constant status updates flashed across the screen you know how distracting it can be. Not to mention potentially embarrassing — if you’re in for this kind of thing.
Sure, the “Do not disturb” mode on top of the notification center in OS X, or the automatic disabling of notification messages when the screen is mirrored to a projector, strongly reduces the risk of these ‘incidents’. But it’s still a risk. And it does not really matter whether you also use your notebook in your private life, as some business messages can also be potentially embarrassing and distracting.
And nothing should distract from a presentation.
There are a couple of solutions to this problem, ranging from manually disabling all programs that could disturb you in a presentation to using a dedicated notebook just for presentations. However, a simple and yet very effective method is to use a dedicated user account on your OS for presentations.
Note: As with anything that involved public presentations this is not something to do a couple of minutes prior to an important presentation. Invest at least an hour to get things working according to your needs. And rehearse using this account as you would do with any important presentation!
User Accounts
Operating systems support multiple user accounts — and they normally used for this purpose: multiple users (= people) working on the same computer. Most people typically have only one account on their computer — their own — as they frequently are the only users. However, there is no reason not to have a second, strictly managed account as well. This presentation account can be configured in a way to prevent any messages or private information from appearing on screen. It has the additional benefit of being able to lock down other software as well.
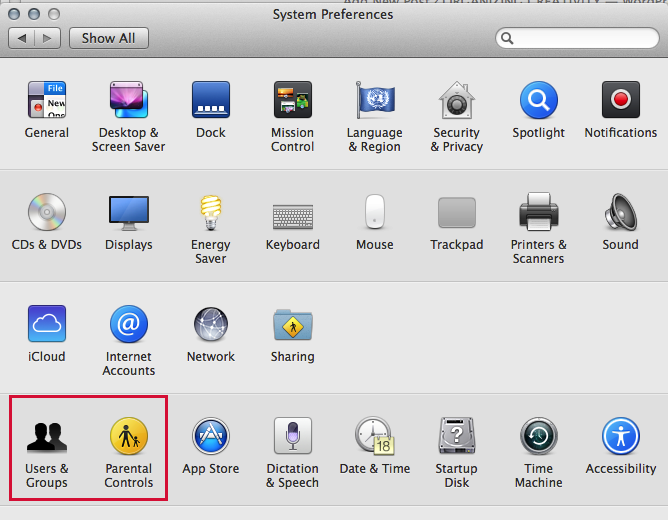
The two icons in System Preferences that you need to create a managed presentation account.
Creating Another User Account on the Mac
It’s actually very easy to create such an account on the Mac. Windows should offer something similar, but I can’t show you graphics, as I refuse to work with that OS. As for Linux — if you use it, you know how to do it, or you should. Anyway, on the Mac, simply go to “System Preferences”, select “Users & Groups” and create another account (+ sign). I strongly recommend using a “Managed with Parental Controls” account instead of the “Standard” Account. This will allow you to use the “Parental Controls” to limit the apps that can be used by this account.
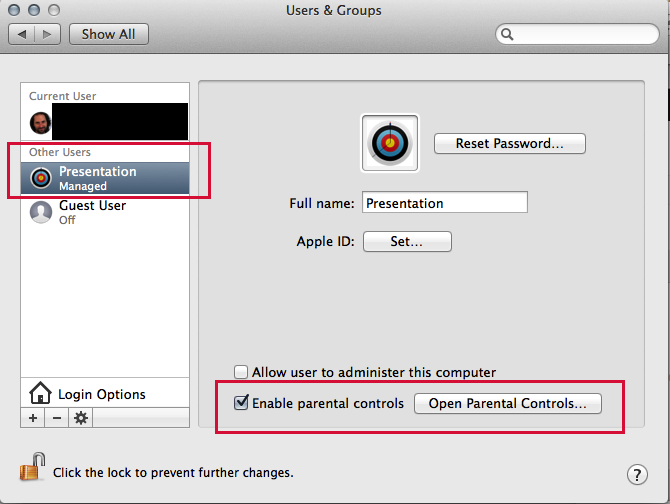
The managed presentation account.
Managing the User Account with Parental Controls
When it comes to allowing or disallowing apps (“System Preferences”, “Parental Controls”), make sure that you allow the use of the System Preferences, as well as your Firewall app (if you use one) and your Virus Scanner (if you use one). If in doubt, allow everything, than manually uncheck the Apps that send messages or show private information (e.g., Skype, Mail, etc.). Also check the other Tabs to allow, e.g., full internet access (if you need to show something during a presentation) or other functionality. Keep in mind that “Parental Controls” was made in the vain hope that children could be “protected” from some apps or information. You are diverting it from its intended use, although probably with more success than parents have.
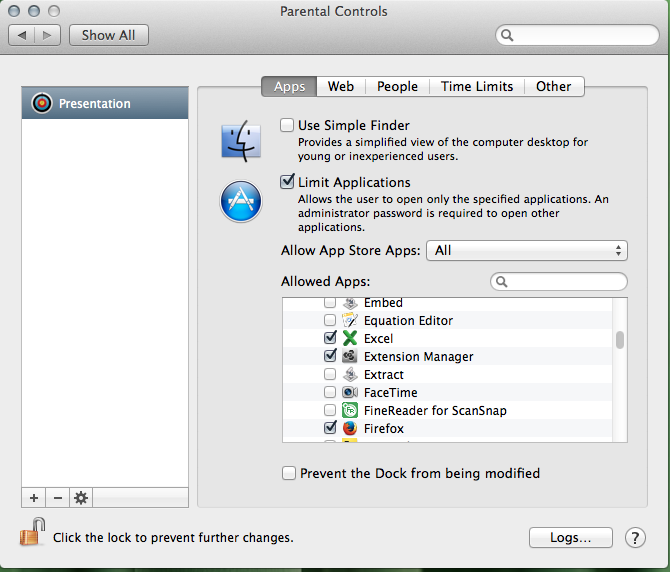
The Parental Controls settings where you can limit access to apps, websites, and much more. Don’t be too stingy, however, and try out the account.
Try it out — again and again
Be prepared to manually allow a couple of processes or programs when you first log into your managed presentation account. Some needed processes/programs might not have the necessary rights. But you can allow them forever so they do not disturb you again. This can happen the first two or three times when you log in, so do it well before your first presentation. Also make sure that the presentation itself runs in your presentation account. You did allow Keynote, PowerPoint, and whatever additional programs you need? Also note that you might restart or at least log out of the managed account to have changes in the parental controls to take effect. And be ready to type in your password a couple of times — when you allow to make changes in the account settings, the parental controls, and for individual apps/functions on the managed account. Depending on the security settings, you might have to type in your main user account name — the one with admin rights.
Configure the Presentation Account
Besides disallowing any messaging and not registering the account with iCloud or any other service, go through the System Preferences and configure the account for presentations. Personally, I removed everything from the Notification Center, changed the background to a boring black, changed the trackpad direction, and a couple of other things. This is an account for only one purpose — make sure it fulfills this role.
Quickly Changing Between User Accounts
You can quickly switch accounts by clicking on your name in the top right corner of the screen (control bar). This is great in case you need to access something in your own user account (or you have forgotten the name of your main user account 😉 ). The downside of switching accounts this way is that it can take a couple of seconds and it might cost more resources. So you might want to log out of your primary account prior to a presentation and only log in your presentation account.
Making the Presentation and Other Files Available on the Presentation Account
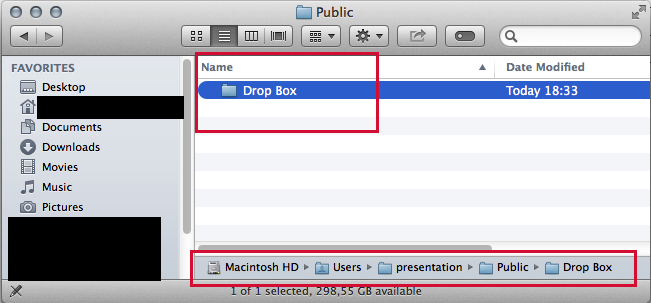
Given that you have created another user account and that your data is not available on this account, you need to make the files and other data available to the presentation account. I find that the easiest way to do so is just to copy the files to the public drop-box folder of the presentation account. Simply use a Finder window, select “View” and “Show Path Bar”, then click on “Users”, select the presentation account, then “Public”. You can copy files into the “Drop Box” folder, but you will not be able to see the files once they are in that folder. So press the “alt” key (green plus sign should appear) to copy the files. You find the files when you log into your presentation account in the same folder — only from the presentation account you can actually open that folder.
Dropping files into the presentation account drop box. Note that you cannot open the “Drop Box” folder of another account, but you can drop files into it — which the other account then can access.
This is an easier solution than to manually give your main account read/write rights on your presentation account file system.
Other Benefits of a Presentation Account
This presentation account can also be useful if you have colleagues wanting to “quickly check something on the net” or “check their emails”, something that frequently happens on conferences. Not to mention friends who want to do the same while they are staying at your apartment. Google search history and auto-completion can also be very … enlightening, and while a certain amount of openness is needed in relationships, some things should stay private.
I simply, and systematically, turn the network interface off. Combine with the Do Not Disturb option of Notification Center.
( http://www.lucbeaulieu.com )